Jupyter本没原稿集#2.2 ipywidgets#2
ToggleButton
トグルボタンです。ボタンをクリックすると真偽値が切り替わり、状態が保持されます。以下のコードでは2つの値の論理積を出力しています。
from ipywidgets import ToggleButton


def x_and_y(change):
    clear_output()
    print(toggle_button_x.value & toggle_button_y.value)


toggle_button_x = ToggleButton(description='x')
toggle_button_y = ToggleButton(description='y')
toggle_button_x.observe(x_and_y, names='value')
toggle_button_y.observe(x_and_y, names='value')
display(toggle_button_x, toggle_button_y)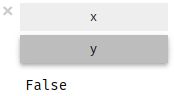
ToggleButton のサンプルコード
Checkbox
チェックボックスです。チェックをした状態が True、チェックを外した状態が Fales となります。以下のコードでは2つの値の論理積を出力しています。
from ipywidgets import Checkbox


def x_and_y(change):
    clear_output()
    print(checkbox_x.value & checkbox_y.value)


checkbox_x = Checkbox(description='x')
checkbox_y = Checkbox(description='y')
checkbox_x.observe(x_and_y, names='value')
checkbox_y.observe(x_and_y, names='value')
display(checkbox_x, checkbox_y)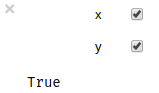
Checkbox のサンプルコード
Valid
真偽値の状態を示すインジケータです。このインスタンスに対して変更はできません。
from ipywidgets import Valid


def is_valid(change):
    valid.value = change['new']


checkbox_valid = Checkbox(description='valid')
valid = Valid(value=False)
checkbox_valid.observe(is_valid, names='value')
display(checkbox_valid, valid)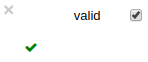
widgets_name のサンプルコード
Dropdown
ドロップダウンから値を選択します。以下のコードはキャラクター名を選択するとそのキャラクターの正体が出力されます。
from ipywidgets import Dropdown


def sos(change):
    clear_output()
    ans = {'朝比奈': '未来人', '長門': '宇宙人', '古泉': '超能力者'}
    print(ans[change['new']])


dropdown = Dropdown(options=['朝比奈', '長門', '古泉'])
dropdown.observe(sos, names='value')
display(dropdown)
Dropdown のサンプルコード
RadioButtons
ラジオボタンから値を選択します。以下のコードはキャラクター名を選択するとそのキャラクターの正体が出力されます。
from ipywidgets import RadioButtons

radio_buttons = RadioButtons(options=['朝比奈', '長門', '古泉'])
radio_buttons.observe(sos, names='value')
display(radio_buttons)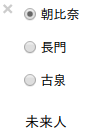
Dropdown のサンプルコード
Select
リストボックスから値を選択します。以下のコードはキャラクター名を選択するとそのキャラクターの正体が出力されます。
from ipywidgets import Select

select = Select(options=['朝比奈', '長門', '古泉'])
select.observe(sos, names='value')
display(select)
Select のサンプルコード
SelectionSlider
スライダから値を選択します。以下のコードはキャラクター名を選択するとそのキャラクターの正体が出力されます。
from ipywidgets import SelectionSlider

selection_slider = SelectionSlider(options=['朝比奈', '長門', '古泉'])
selection_slider.observe(sos, names='value')
display(selection_slider)
SelectionSlider のサンプルコード
ToggleButtons
トグルボタンから値を選択します。以下のコードはキャラクター名を選択するとそのキャラクターの正体が出力されます。
from ipywidgets import ToggleButtons

toggle_buttons = ToggleButtons(options=['朝比奈', '長門', '古泉'])
toggle_buttons.observe(sos, names='value')
display(toggle_buttons)
ToggleButtons のサンプルコード
SelectMultiple
Ctrl キーまたは Shift キーを押しながら複数の値を選択できます。以下のコードは定義した辞書から組み合わせに応じた結果が出力されます。
from ipywidgets import SelectMultiple


def relation(change):
    clear_output()
    ans = {('岡部倫太郎',): '鳳凰院凶真', ('阿万音鈴羽',): '未来人', ('橋田至',): 'スーパーハカー',
           ('岡部倫太郎', '阿万音鈴羽'): 'バイト戦士', ('岡部倫太郎', '橋田至'): 'ダル',
          ('阿万音鈴羽', '橋田至'): '親子', ('岡部倫太郎', '阿万音鈴羽', '橋田至'): 'ラボメン'}
    print(ans[change['new']])


select_multiple = SelectMultiple(options=['岡部倫太郎', '阿万音鈴羽', '橋田至'])
select_multiple.observe(relation, names='value')
display(select_multiple)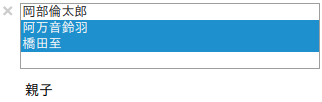
SelectMultiple のサンプルコード
Text
テキストボックスです。以下のコードでは入力した文字列を式として評価した結果を出力します。.on_submit() メソッドはテキストボックス上で Enter キーが入力されたイベントをハンドリングします。
from ipywidgets import Text

def calc(submit):
    clear_output()
    try:
        print(eval(submit.value))
    except Exception:
        print('Error')

text = Text()
text.on_submit(calc)
display(text)
Text のサンプルコード
Textarea
複数行を入力できるテキストボックスです。以下のコードでは入力した文字数をカウントした結果を出力します。
from ipywidgets import Textarea

def wc(change):
    clear_output()
    print(len(change['new']))

textarea = Textarea()
textarea.observe(wc, names='value')
display(textarea)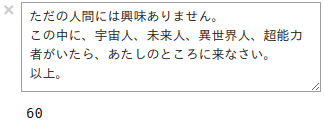
Textarea のサンプルコード
Label
ラベルを表示します。このインスタンスに対して入力は受け付けません。以下のコードでは LaTeX 書式にて記述しています。数式の記述については 書籍 にて解説します。
from ipywidgets import Label

Label(value='$E=mc^2$')
Label のサンプルコード
HTML
値を HTML として出力します。以下のコードでは簡易的な HTML エディタを作成しています。
from ipywidgets import HTML

def html_editor(change):
    html.value=change['new']

html = HTML()
textarea = Textarea()
textarea.observe(html_editor, names='value')
display(textarea, html)
HTML のサンプルコード
HTMLMath
値を HTML として出力します。数式を含むことができます。
from ipywidgets import HTMLMath

HTMLMath(value='<b>ものすごく</b>有名な式:<br> $E=mc^2$')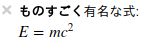
HTMLMath のサンプルコード
Image
画像ファイルを表示します。
from ipywidgets import Image
from urllib.request import urlopen

url = 'https://www.python.org/static/img/python-logo.png'
res = urlopen(url)
Image(value=res.read(), width=290, height=82)
Image のサンプルコード
Button
ボタンです。ボタンが押された際に、on_click() メソッドがイベントハンドラとなります。以下のコードでは乱数で生成した値を出力しています。
from ipywidgets import Button
from random import randint


def omikuji(submit):
    clear_output()
    data = {0: 'ハルヒ', 1: '長門', 2: '朝比奈さん', 3: '小泉'}
    print(data[randint(1, 3)])


button = Button(description='誰と組む?')
button.on_click(omikuji)
display(button)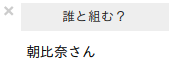
Button のサンプルコード
Play
アニメーションを制御します。再生、一時停止、停止ボタンが用意されています。以下のコードでは 書籍の7章 で紹介したアニメーションをウィジェットで制御しています。
from ipywidgets import Play, Layout
from bokeh.plotting import figure
from bokeh.io import output_notebook, show, push_notebook
from numpy import arange, sin, pi

output_notebook()


def calc_sin(i):
    return sin(x + i / 10.0)


def update_graph(change):
    r.data_source.data = {'x': x, 'y': calc_sin(change['new'])}
    push_notebook(handle=t)


p = figure(plot_width=400, plot_height=200)
x = arange(0, 2 * pi, 0.01)
r = p.line(x, calc_sin(0))


play = Play(layout=Layout(width='20%'))
slider = IntSlider()
play.observe(update_graph, names='value')

t = show(p, notebook_handle=True)
display(play)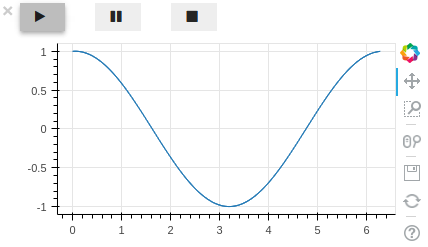
Play のサンプルコード
DatePicker
カレンダーから日付を入力します。以下のコードでは入力された日付とコンピュータの日付の差分を日数で出力しています。
from ipywidgets import DatePicker
from datetime import datetime


def weekday(change):
    clear_output()
    days_diff = (change['new'] - datetime.now().date()).days
    if days_diff >= 0:
        print('{}日後'.format(days_diff))
    else:
        print('{}日前'.format(abs(days_diff)))


date_picker = DatePicker()
date_picker.observe(weekday, names='value')
display(date_picker)
DatePicker のサンプルコード
ColorPicker
見本リストから色を選択します。値は16進数のRGB表記です。以下のコードでは選択された色を10進数のRGB表記に変換し、HTML で表示しています。
from ipywidgets import ColorPicker, jslink


def change_color(change):
    color16 = change['new']
    r = int(color16[1:3], 16)
    g = int(color16[3:5], 16)
    b = int(color16[5:7], 16)
    html_text = '<font color={0}>R:{1}, G:{2}, B:{3}</font>'
    html_text = html_text.format(color16, r, g, b)
    color_text.value = html_text


color_picker = ColorPicker()
color_text = HTML()
color_picker.observe(change_color, names='value')
display(color_picker, color_text)
DatePicker のサンプルコード
Copyright © 2020 driller
Powered by miyadaiku